Wednesday, August 29, 2012

TFGSC 28


Lately my cards have been simple and clean, so now I wanted to bring the whole arsenal. Behold the result!


I love this set by TGF and I looked a good deal before I found someone who would ship to Sweden. I used it right away to make cards in which I enclosed a couple of tea bags and some chocolate to all my girls out there. Great happy mail during fall when it's dark and rainy, it was well appreciated. I'll think about doing it again this year...
 
Anyhow, I've got inspired by the TGFSC 28 sketch and I coloured the face and hair with promarkers and copics. For once I actually remember (meaning wrote down - LOL!) which colours I used.

Hair: E51, E53
Face: Ivory, E50, Blush, Dusky pink
Hairband: V000
Bathtub: Lindy stamp gang creme brulee cream
Legs of bathtub and frame of diecut: R000
Bubbles: Glossy accent


All the flowers are from I am roses and there are 2 flowers I've made myself of polymer clay using flexible molds from Kawaii. The flowers are coloured with LSG salt water taffy spray and magical, to add the same colour but still different intensity. I like the depth it made. There is also a skeleton leaf and some rose leaves coloured with LSG sea grass green, as they take the spray differently the looks of them also varies. Both of the sprays comes from LSG nantucket pearls set.

To top it of I made two stick pins I've added some pearls to and some prima bling of course.

The flowers are: R2-15, R5-15, R8-15, S3-310, ZQLO-151 and a small natural skeleton leaf.


For the boarder in background I used a punch from ek success and layered some pink trim I had in my stash. On top of that I glued some mini iridescent pearl trim also from my stash, so I don't remember where I got it from. For the rosette that was part of the sketch I used some pink satin ribbon, which I (after a lot of fiddling) managed to thread a heart on each end and tie a knot. I'm very please by the result as I never manage to tie a knot where both ends hangs down. Somehow one always keeps sticking up?!

My sentiment "me time" is stamped on paper with memento ink and I used a tim holtz framgent charm with some pink satin ribbon and bling on. The paper is from Bo Bunny Gabrielle collection and DCWV Mariposa paperpad and I distressed to edges good.


I've uploaded this card to:
Anyone for Anya - Inspired by time
Whimsy stamps - lots of layers
House of Gilli - Favourite colour combination
Craft your days away - anything goes
Simon say stamp challenge blog - anything goes
Splitcoaststampers - MsScrapmess gallery
Facebook - Pi Scrapmess


If you have any questions, please let me know.
Thanks for visiting!!!

Saturday, August 25, 2012

Back to school challenge


You might have read in my earlier blog post that I've been sitting some back to school challenges out, since I don't have any school themed products... Meaning i have no G45 abc primer paper - LOL! 
The card's size is 5 3/4 x 4½ inches and I have used the sketch from Anyone for Anya.


As I found out, it's not in the paper! (Or yes it it, but not in the way I imagined) I found some yellow paper in a collection pack which combined with black and that red cardstock that's been sitting in my christmas stash made just the perfect colour combination for school themed projects. Therefore, I'm particulary glad simon say stamp once again host a back to school challenge. I will also enter the card for simon say stamp vintage blog no rules - I hope my dress makes it vintage enough...


I knew right a way that I wanted to paperpiece her dress and bow as I've coloured a lot of my latest projects with alcohol pens and wanted to try something new. So it was perfect that TGF FFF also was paper piecing. I'm quite pleased that I managed to incorporte the pattern from a scrap piece of Teresa Collings "giving thanks" into her dress construction.

I didn't want to make this card to similar to my back to school mini book and I used Jill from the creeper crew as she has a bit of rebellish attitude. But I stayed away from the letters a b c as I thought it would be just to close to the mini book, although I wanted them...

In order to follow the sketch I finally got to use some left over ribbon from a scrapbook magazine in yellow. I had brads in mind, but in comparsion to the ribbon they were to small. So I used them to fasten my image instead and coloured I am roses R2-15 with a promarker tulip yellow instead.

Also entered in:
craft your days away - anything goes
whimsy stamps - lots of layers

This challenge has been beyond great for me as I "learned" how to destash - LOL! I hope I'm not the only one who might be shopping in a higher rate then I use it - although I need all those product to create, don't I? I love Rachel's (rach0113) it started with a shoe box, because that's exactly that happend for me. My scrapbook embellishment was literally just ephemera from tickets, reciets and postcards where I'd been. Armed with scissors, pens and glue I went to town - LOL! Then I started making some card with some stamps and coloured paper I bought cheap and stored it in a shoe box. Soon I treated myself with some scrapbook and paper craft magazines... I started to find actual scrapbook stores, but it was so expensive I could not possibly afford all of it. But now my stash had grown to an IKEA box underneath the bed and some drawers. Then one happy day, I got intruduced to you tube and now I need my daily kick of inspiration - LOL! Thanks to Arlene and friends, I have discovered Lindy stamp gang sprays, i am roses flowers and my favourite things dies. I have discovered how much cheaper everything is online and it's even worth the shipping to Sweden which provides me with a healthy supply with Tim Holtz and The greeting farm stamps. You can not believe how fast my stash has grown and it's like an explosion as I nowadays more or less has taken over the entire appartment. My poor man don't know what hit him - LOL! I'm so lucky as he supports my hobby so wholeheartedly, but I'm sure he will appreciate the day we get a larger home where I can store all of my supply in one room and where he can shut the door to the mess - I won't argue, I promise -LOL!!!

I'm sorry if you find me blabbering along here, what I meant to say was that I'm so proud of myself that I managed to control my instinct to run to my LSS and buy school themed products (meaning G45 abc primer paper), which I'm sure would have had a few extra in the bag as well before I reach back home. Instead I actually decreased my stash with a fraction. 

If you've reached the end - congrats!
It's finally over, I thank you from my heart for taking the time to read it all!!!


Monday, August 20, 2012

Back to school mini book - Aug IARCC


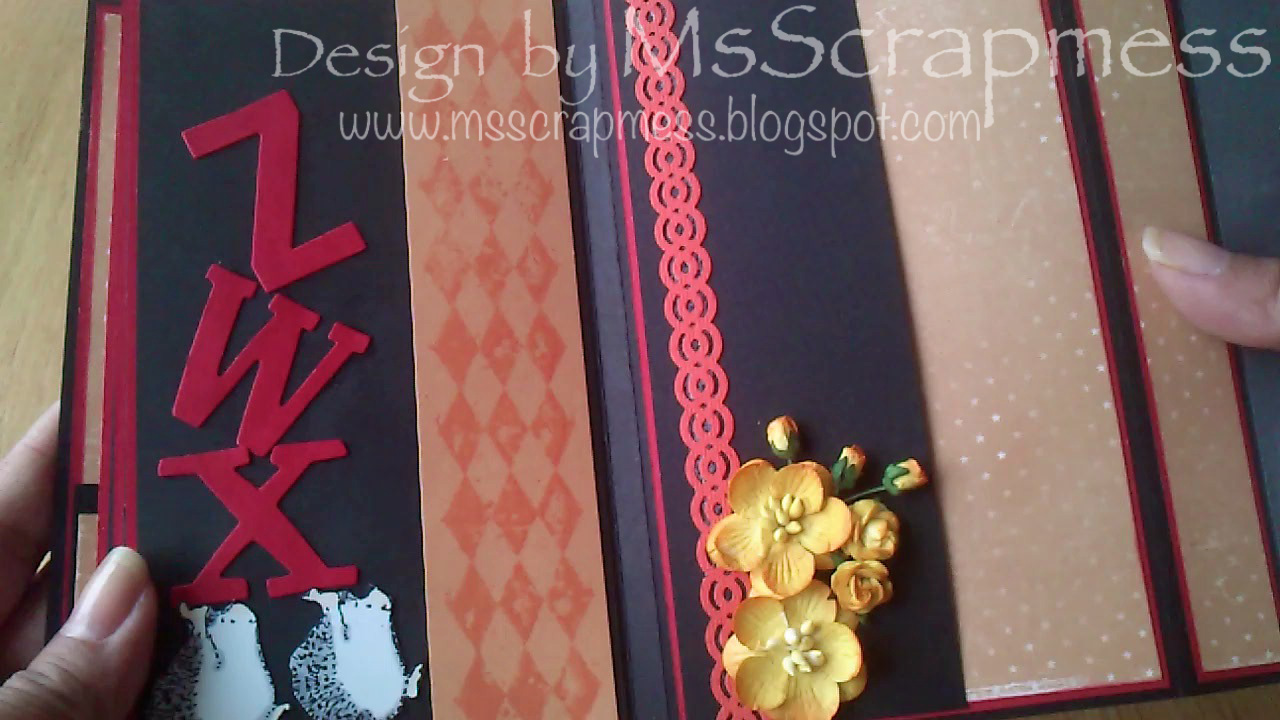
...Or more like start of school... I got inspired by Arlene's (butterflykisseswithlove) project where she altered a "box" to keep her son's kindergarten memorabilia in. Here is the rest of the mini book, as promised - I even made a video presenting it.


There has been a number of "back to school" challenges that I've thought to myself "I probably should sit this one out since I don't have anything school themed"... I've been looking on Graphic 45's ABC for quite some time now... But my monthly challenge is to use my supply rather then to increase it, due to space... and budget - LOL!

But what do you know?! Turns out I have plenty in my stash to make school themed project - don't I feel like a bag of nuts? The base is red cardstock from my christmas stash layered with black, yellow and orange paper. The orange paper is from Maja design "skärgårdsliv" and the yellow is from a collection pack from Simple stories summer fresh.


The numbers and letters in red are from Tim Holtz wordplay - love that die! I waited for months before it arrived, but totally worth the wait.
The stamped images are from the greeting farm, penny black and disney's clear stamp set winnie the pooh set 3. All are coloured with alcohol pens and fussy cut.


The flowers are from I am roses, which I've coloured with Lindy stamp gang Marigold yellow orange. The flowers I've used are T1-147, R2-15 and S3-151. I've also added some bling I bought a long time ago, i like that glass look to them, don't they look like dew drops.


I left a lot of layered black cardstock. I wanted to make it similar to an old classic blackboard. You could journal with a white pen to enhance the effect - put photos on them for photo mats - whatever you want.

I wanted it to look like he is throwing numbers in the air

The hedgehogs are actually carring a gift box, but here I've had them carring
letters - LOL!


More of the IAR, these are coloured with distressed with mustard seed and just a touch of LSG marigold yellow orange.


Challenges I've participated in:
I am roses - yellow (back to school)
Simon says stamp - animal antics
Simon says stamp - no rules
Whimsy Stamps - lots of layers
craft your days away - anything goes


Thank you for taking the time to visit, I hope I've inspired somewhat
'til next time!!