Tuesday, October 27, 2015

2015 December daily 3

Hi everyone!

I'm here with the third update of my December daily 2015 :D

So far I managed to get the first 3 datecards in 4x6 HERE
and 6 journaling and filler cards in 3x4 HERE done. 
For more information about the set up, please check HERE.
I'm using pocketed scrapbooking 12x12 design A and my intention is to have a whole page per day.

I'm trying to share a process video here, what you don't see is that I have everything from my set up on my dining room table (and a bit more...) I'm getting stage fright though, so I didn't feel that any of the card is actually entirely done. But hopefully you'll get the idea of how I'm working, the inspiration is from Nicolejones911's December daily 2014.


Products used from The Rubber Buggy store:
On all cards
Ranger embossing powder gold tinsel
Stamping supplies (Acrylic block, adhesive, neenah heavy cardstock solar white, etc)


Dec 6 
MFT die-namic decorative doily (no longer available)
(similar die) MFT die-namic dainty doily 
Lawn Fawn 12x12 paper Let's bokeh in the snow collection pack
Lawn Fawn Sweet Christmas stamps
Lawn Fawn 12x12 collection kit snowy days (manufactor's strips)
MFT die-namic let it snowfall


Dec 7
MFT die-namic decorative doily (no longer available)
(similar die) MFT die-namic dainty doily 
Lawn Fawn 12x12 collection kit snowy days 
MFT die-namic let it snowfall
Magnolia 12x12 paper Vintage Christmas Snowy wood
I put an eyelet and string in the Lawn Fawn tag


Dec 8
MFT die-namic decorative doily (no longer available)
(similar die) MFT die-namic dainty doily 
Lawn Fawn 12x12 collection kit snowy days 
MFT die-namic let it snowfall
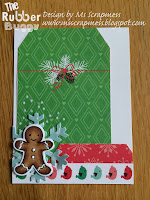


3x4 Filler card
Lawn Fawn 12x12 collection kit snowy days 
MFT die-namic let it snowfall
Lawn Fawn Sweet Christmas stamps

I might put an eyelet and string in this tag too, as I did on Dec 7.


4x6 Filler card
Lawn Fawn 12x12 collection kit snowy days 
Lawn Fawn cuts Puffy cloud borders


Thank you for visiting!

Tuesday, October 20, 2015

Merry Graphic 45

Hi everyone!

I'm here with a Christmas card using Graphic 45 as my DT-project for The Rubber Buggy :)
Mainly the old Place in time collection, but you'll see I've used a non-Christmas collection of course - LOL!


My inspiration for this card was the Santa in sleigh piece from their chipboard. I really loved the dark blue sky with the red Santa and green tree. So I added a dark blue mat behind everything and that's my non-Christmas item. I used a blue from French Country collection. Love my new system where I organise everything according to color rather then by collection. I'm so using up my older stash this way.

The pionsettias have been colored with glitter mist and you can find great selections from both Prima and Blue Fern Studio in the store.

Have you seen the gorgeous Venice lace that Kellie has been filling the store with?
Just imagine what wonderful creations you can make with those :)

Thank you for visiting!

Tuesday, October 13, 2015

Christmas card for The Rubber Buggy

Hi everyone!

I had a blast making this card.
I will probably semi mass produce this one later.


I must admit, now that I've tried it. I will actually reverse the process - LOL!
For this card I started with putting the sentiment together, in order to make it fit. I did consider to simply cut it apart with my scissors. But in the end I masked it, one word at the time. Then the hard part started... where I discovered it would be suitable to start with the image instead. My idea was to have the little cute penguin skate on the sentiment, thus I needed to have the right angle and the right amount of white space in order to be able to draw skates on his little feet... Hard enough, but I also wanted to mask him for his little santa hat and to me the hat was needed to be stamped first... Oh, my!

So, next time I'll do it in this order :)
Stamp the santa hat, then the penguin, draw skates, stamp the sentiment. Decide the card size :)
Cut the paper, color with copic markers and hope for the best - LOL!


Products used from The Rubber Buggy store:
Lawn Fawn Toboggan together stamp set
Copic markers
Neenah cardstock
Lawn Fawn 6x6 paper Let's Bokeh in the snow 
Lawn Fawn cuts puffy clouds borders


Thank you for visiting!

Challenges entered:
http://lawnscaping.blogspot.se/2015/10/lawnscaping-challenge-sentiments.html
Lawnscaping challenge #115 - Sentiments 
Simon says stamp Wednesday challenge - Clean and simple Christmas

Tuesday, October 6, 2015

2015 December daily 2

Hi everyone!

I'm here with the second update for my December daily 2015.
You can read about the first update HERE
and about the set up 2015 HERE

I have a good feeling about this so far, since there is still months to December - which is well needed in my case :) (Slow progress, but good progress, right?)


I know, I know. I was supposed to make all the 4x6 cards with the dates first. They are still my top priority, but I was just in the mood for some easy 3x4 filler and journaling cards.

Top left:
Super easy. A bit of gold washi from my stash and a piece of manufactore strip from Lawn Fawn on top of it. My plan is to leave it like that and have it like a journaling card. But I'll decide wether I''ll write direct on top of it or put another shaped layer to write on later. The paper is Magnolia 12x12 Vintage Christmas Ice princess cut into 3x4.

Top middle:
I'm super happy about how this turned out and it didn't take very long time to produce, but before I had wrapped my head around it... I really have to squeeze out creativity sometimes - LOL!
It's plain white cardstock cut into 3x4. I then added some scraps from a couple of manufactore strips on the top and bottom. The "you" is a die cut from Memory Box amazing you and the rest of the sentiment is from Wplus9 Handlettered thanks. I added a flair botton from the collection kit by Lawn Fawn Snow days (that's the paper from where the manufactore strips origin too) and stamped a couple of hearts in different sizes using Lawn Fawn stamp set Snow days. I used distress ink in Festive berries.

Top right:
Magnolia 12x12 Vintage Christmas Red noel cut into 3x4. A bit of washi music notes and a piece of manufactore strip on top. I cut the corners with a scissor, to add some interest. This card is also likley to hold either a small photo or some sort of journaling.

Bottom left:
This is a cut-a-part from the Lawn Fawn collection kit Snow day, so it is already a 3x4. I only added the flair from the same collection and a bow from the stamp set Snow day, die cut it with the coordinating die set and viola! I even used Lawn Fawn ink, freshly cut grass.

Bottom middle:
Magnolia 12x12 Vintage Christmas Snowy wood cut to 3x4. The washi tape is to ground the other pieces. Which is a scrap paper from Lawn Fawn collection kit Snow day, I rounded the top right corner. The little banner sticking out is part of a manufactor strip which has a bunch of banners saying "date:". But I hid the text. It's likely that this card will hold a smaller photo. I might write something on the banner or just make a smiley face...

Bottom right:
The 3x4 card is also a cut-a-part from the collection kit mentioned earlier. I had some intention of making something with the banner, but in the end I stuck to what's simple and just added the little snow scene, which is actually part of the packaging to mentioned collection kit :)


I hope I made sense, but if you have any questions just let me know.
Thanks for visiting!