Showing posts with label Simon says stamp. Show all posts

Saturday, September 6, 2014

Lawnscaping challenge - one layer

Hi everyone!

I'm on a roll now - LOL!!
For my other SSS Stamptember card please scroll down or find it HERE

What can I say, September - STAMPTEMBER, just gets me going :P

I'm here with my latest love affair - Lawn Fawn :D
Yes, yes, yes... I know, you've all already been charmed by them. But again, if you know me... You know I'm the latest... I blaim the limited supply we have in Sweden, haha!

Anyhow, as I recently been smitten with Lawn Fawn, no wonder I also just discovered Lawnscaping challenges too :D

This week was ONE LAYER, not as easy as you may think. But I'm loving it!!


I've used the sentiments in the PLUS ONE set and teamed them with Simon says stamp BABY clear stamp to create a boarder on the card. Super pleased with the result. However, it turned out that the clear stamps were different in hight, so if you were planning to try this technique - do have an extra acrylic block nearby. This will make it easier for you, not needing to replace all the stamps every time. I then just stamped my image, coloured it quickly with (mainly) copic markers and that's it.
Go one layer!

It is only one layer - honestly :)
I would like to say that this was easy...
But it took me four tries, before I got it right...
I will say though, that after I got it right... :)
... it was a no brainer! (Blaiming preggo-brains)

Lawnscaping challenge - one layer
SSS wednesday challenge - stamp it and blog hop

I hope you like it!!
Thank you for visiting :)


Products used on this card:
Copic markers (C0, C1, E00, R000, R01, E50)
Promarker (ivory)


Simon says STAMPTEMBER challenge

Hi everyone!

I'm here with a card for a college of mine, who recently undergone heart surgery. I just wanted a simple one and I thought of these old Teresa Collins' clear stamps, vintage finds, which really goes with anything!

I truely love this set, but I use them far to rarely - and what do you know... They ripped?!?!? Both the story- stamp and the time-stamp which you put in the window of the bingo card :( Crying my eyes out now!! I'm actually considering to rebuy them...


I couldn't resist to put some of my latest buy at I am roses, but pastel combo of the R6-roses. Gorgeous mix of colors! Love every one of them. I also added the cherry blossom and the tiny rosebuds from my stash. Of course I also sprayed them with Biscotti pearl mist, before I stucked them down.

This card is entered in SSS wednesday challenge - stamp-it and blog hop
. I was really pleased as I put it together, but I can now see that I could have done with some background stamping as well... A fav of mine is to combine these stamps with the background stamp from Tim Holtz' papillon cling set. I also really need to work on my stash on sentiments... Reason to shop ;)


Products used on this card:


I hope you liked it :)
Thanks for visiting!

Sunday, September 9, 2012

Artjournal


A while back, inspired by RachO113, I bought myself a moleskin journal. It has not been used many times i'm afraid. But I like to have the option, that if I should be in the mood for something other then a card or LO, I can still create in my so called art journal. I've also been thinking about collecting small pearls of wisdom that may not be suitable for a card - but that idea has never gotten further than anything more than an idea.

However, inspired by Anyone for Anya - anything but a card, I now dug through all the dust and cobweb - LOL! No, not that bad. But it was far in among all my stash. It turned out better than I imagined at first, so I'm quite pleased, although it shows that I'm a new beginner to art journaling.


I incorporated several challenges into my page, which was the main purpose, but I was not in the mood for a card. I have also been playing around with some more monochromatic colouring, I need to get more pens though. TGF-FFF was to use bright colours, in my interpretation I make the image pop more among the colours. TGF retro-fresh challenge turned out to still be open, so I used yellow, orange and blue (oops, I just noticed I forgot about the "baby")...
As it was to be a journaling page, I also incorporated a lot of text and script, therefore I can enter it in simon says stamp's read all about it and it's all about stamps. The layout is inspired by TGFSC29.


I started by covering my page in distress stain "dried marigold" and sprayed it with LSG "marigold yellow orange" to get it all shimmery. The stamps in the background are in distress ink "spiced marmalade"  The stamps are from Hero art and whimsy stamps. In the ledger stamp I have also used a  french script stamp in "dried marigold" to make it look like journaling. But I left the space if I want to add a quote later. I have also used parts of an old splatter stamp. The carte postale and the stamp is from TH clear stamps - french market. The tickets and the flourishes are from MFT dienamics. The tickets are stamped in "dried marigold" with stamps from MFT, TH papillon and Unity itty bitty dream big. The flourishes are also stamped in "dried marigold" with the script from TH mini ornates set.

If you have any question don't hesitate to ask!
'til next time:)

Saturday, September 8, 2012

Simon says put a stamp on it and read all about it!

Simon says stamp has two super fun challenges this week. One is to use stamps - what else I ask:) and one is to put some words/text out there. Both challenges also include a bit if blog hoping. How much more inspirational can it be?! So after finishing the challenge blog's blog hop I had inspiration bursting out my fingers, so I decided to make more - LOL!


This was made in minutes, excluding all the fussy cutting. I'm the slowest cutter ever!
The inspiration as probably many of you can see is Teresa Collins vintage finds. When I saw bluemoons scrapbooking showing this collection I new I wanted all of it.

Except from the background, that is TH papillon, the stamps are from Vintage finds set #1 and #2. The ink used is tsukineko memento dye in Toffee crunch - love this colour! Thank you bluemoon:)

As the DT of SSS had used washi tape on most of their cards, I did not want to be left behind and also used some of the tape from TC.I also heat embossed the vintage clocks in copper. The background itself has plenty of different script, as does the damask, but I also stamped words from the set in archival ink coffee. This turned out so well, I had to finish the inside, just to be able to stamp some more:)


Well, have I used all the inspiration yet? Not even close! And it's not even noon - I have a feeling of this is becoming a very creative weekend - LOL!!!

I also has some super exciting news!!
I have been paper crafting all my life, but just recently took the plunge to go public with my work. The reason for that is my discovery of youtube a year ago. I've been so inspired by all you talented people out there and my own paper crafting has evolved tremendously thanks to you all. So I wanted to give some back and started this blog, a facebook and youtube. The response have been overwhelmingly more than I expected! I've entered challenges and truly have had so much fun to play with all of you!

Now last week I won the challenge for Anyone for Anya and this week I was offered a membership in The Rubber Buggy's first ever design team!!! This is so exciting I could just burst in flames here and now!!!

So I hope  all of you who takes the time to visit me also will stop by the rubber buggy. I found out about the DT call through splitcoaststampers, but it turns out to be this hidden little gem of stores and for all you international stampers - super great shipping prices!! They offer free shipping after spending just $100!!! For all you in the US, this may be expensive. But for us in Sweden... This could easily be spent at home as a G45 12x12 cost a little more than $30. A TH alterations die just about under $30 - you see my point... Thus, the shipping cost still makes it worth shopping online, but the low shipping cost is greatly valued:)

Thank you for popping by!
All comments are greatly appreciated, have a great weekend!! 


Wednesday, August 29, 2012

TFGSC 28


Lately my cards have been simple and clean, so now I wanted to bring the whole arsenal. Behold the result!


I love this set by TGF and I looked a good deal before I found someone who would ship to Sweden. I used it right away to make cards in which I enclosed a couple of tea bags and some chocolate to all my girls out there. Great happy mail during fall when it's dark and rainy, it was well appreciated. I'll think about doing it again this year...
 
Anyhow, I've got inspired by the TGFSC 28 sketch and I coloured the face and hair with promarkers and copics. For once I actually remember (meaning wrote down - LOL!) which colours I used.

Hair: E51, E53
Face: Ivory, E50, Blush, Dusky pink
Hairband: V000
Bathtub: Lindy stamp gang creme brulee cream
Legs of bathtub and frame of diecut: R000
Bubbles: Glossy accent


All the flowers are from I am roses and there are 2 flowers I've made myself of polymer clay using flexible molds from Kawaii. The flowers are coloured with LSG salt water taffy spray and magical, to add the same colour but still different intensity. I like the depth it made. There is also a skeleton leaf and some rose leaves coloured with LSG sea grass green, as they take the spray differently the looks of them also varies. Both of the sprays comes from LSG nantucket pearls set.

To top it of I made two stick pins I've added some pearls to and some prima bling of course.

The flowers are: R2-15, R5-15, R8-15, S3-310, ZQLO-151 and a small natural skeleton leaf.


For the boarder in background I used a punch from ek success and layered some pink trim I had in my stash. On top of that I glued some mini iridescent pearl trim also from my stash, so I don't remember where I got it from. For the rosette that was part of the sketch I used some pink satin ribbon, which I (after a lot of fiddling) managed to thread a heart on each end and tie a knot. I'm very please by the result as I never manage to tie a knot where both ends hangs down. Somehow one always keeps sticking up?!

My sentiment "me time" is stamped on paper with memento ink and I used a tim holtz framgent charm with some pink satin ribbon and bling on. The paper is from Bo Bunny Gabrielle collection and DCWV Mariposa paperpad and I distressed to edges good.


I've uploaded this card to:
Anyone for Anya - Inspired by time
Whimsy stamps - lots of layers
House of Gilli - Favourite colour combination
Craft your days away - anything goes
Simon say stamp challenge blog - anything goes
Splitcoaststampers - MsScrapmess gallery
Facebook - Pi Scrapmess


If you have any questions, please let me know.
Thanks for visiting!!!

Monday, August 20, 2012

Back to school mini book - Aug IARCC


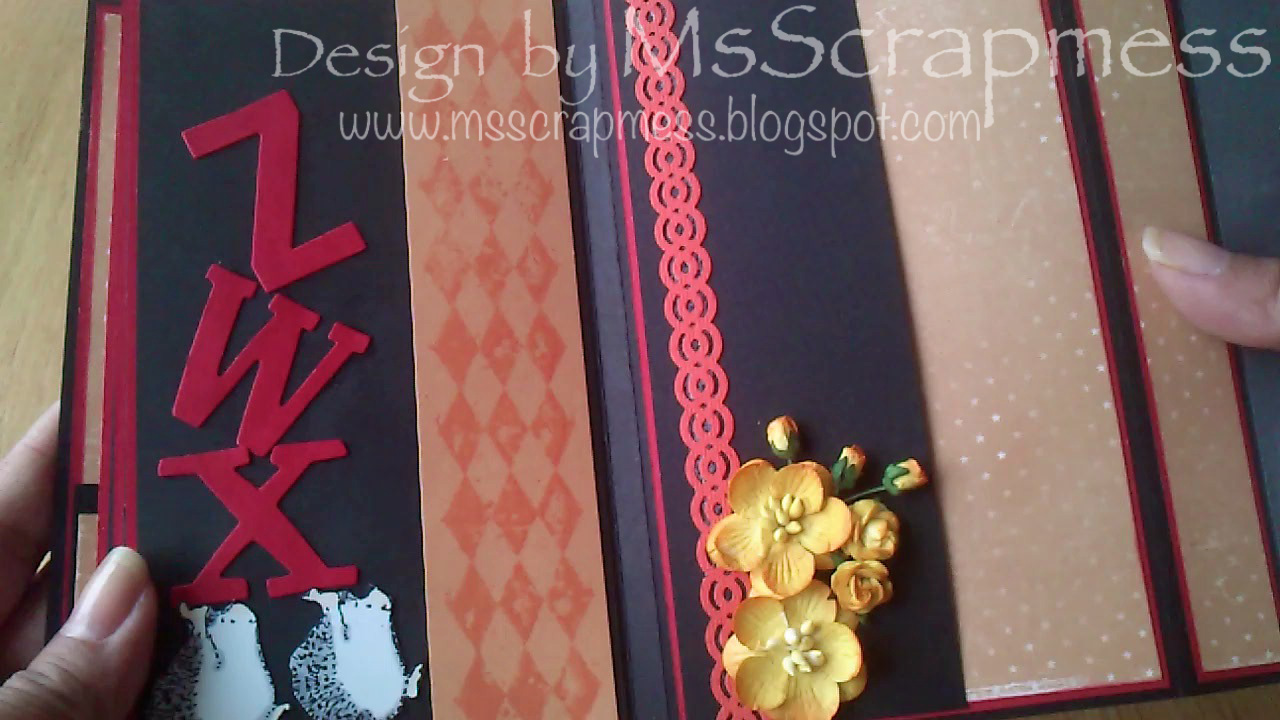
...Or more like start of school... I got inspired by Arlene's (butterflykisseswithlove) project where she altered a "box" to keep her son's kindergarten memorabilia in. Here is the rest of the mini book, as promised - I even made a video presenting it.


There has been a number of "back to school" challenges that I've thought to myself "I probably should sit this one out since I don't have anything school themed"... I've been looking on Graphic 45's ABC for quite some time now... But my monthly challenge is to use my supply rather then to increase it, due to space... and budget - LOL!

But what do you know?! Turns out I have plenty in my stash to make school themed project - don't I feel like a bag of nuts? The base is red cardstock from my christmas stash layered with black, yellow and orange paper. The orange paper is from Maja design "skärgårdsliv" and the yellow is from a collection pack from Simple stories summer fresh.


The numbers and letters in red are from Tim Holtz wordplay - love that die! I waited for months before it arrived, but totally worth the wait.
The stamped images are from the greeting farm, penny black and disney's clear stamp set winnie the pooh set 3. All are coloured with alcohol pens and fussy cut.


The flowers are from I am roses, which I've coloured with Lindy stamp gang Marigold yellow orange. The flowers I've used are T1-147, R2-15 and S3-151. I've also added some bling I bought a long time ago, i like that glass look to them, don't they look like dew drops.


I left a lot of layered black cardstock. I wanted to make it similar to an old classic blackboard. You could journal with a white pen to enhance the effect - put photos on them for photo mats - whatever you want.

I wanted it to look like he is throwing numbers in the air

The hedgehogs are actually carring a gift box, but here I've had them carring
letters - LOL!


More of the IAR, these are coloured with distressed with mustard seed and just a touch of LSG marigold yellow orange.


Challenges I've participated in:
I am roses - yellow (back to school)
Simon says stamp - animal antics
Simon says stamp - no rules
Whimsy Stamps - lots of layers
craft your days away - anything goes


Thank you for taking the time to visit, I hope I've inspired somewhat
'til next time!!


Sunday, August 19, 2012

Card for TGFSC 27


I've finished the kindergarten mini album, I will post it shortly, I just have to get the video to work. Me and technology - LOL!

During the weekend I have also managed to make a card from the greeting farm's weekly sketch. Here is the result, I wanted to make a card without any "extra" from the sketch, which is why it may look a bit naked compared to my other cards. For me it would be natural to embellish it more with some bling and flowers - but I like the way it makes my image really pop.


I didn't have any twine in black thin enough to give me the impression I wanted with Tim Holtz word band in metal, so I used a thin slice of paper.


Instead of a heart, I used the clock face and game spinners to represent both limits and endless time. This is the only thing I changed from the sketch.


The paper is from Authentique paper, 6x6, Journey - A lovely patterned paper in blue tones. I've layered it, one of my favourite techniques, on black cardstock and the background is just some grey print paper I had in my stash.


The size of the card is 4,5x6 and I will enter the card in Simon says stamp vintage challenge and Whimsy stamps challenge as well. The stamped image is TGF cheeky geeky, my newest addition to my collection. You may recognize the image as it is my first try with the stamp and I've used it as my profile pic for both my blog and my facebook account.

If you have any questions, please let my know.
Thanks for stopping by and have a great day!


Thursday, August 16, 2012

TGF - FFF


When the challenge back for school this week came up I almost decided not to enter.
I merely have no school themed products to work with?!
But as I saw Arlene's project for her son who's about to start kindergarten, it just so happens my one and only nephew starts kindergarten next Monday as well. So full of inspiration, I decided to make him a little mini mini album to remember the first day of kindergarten. So here I am... Turns out I do have something to work with?!


I'm a bit ashamed that it is a bit in the middle of the project and not an entirely finished book. But I hope I will qualify anyway - if not please tell me, since I really pushed it just to be able to enter. I've only finished the cover of the book. It closes with some magnet and there are three pages in there, which I will embellish later.

For my image I used the dad from the mom and dad set and coloured him as my little nephew - he's 1,5 years old. I wrote "Viktor's first day of kindergarten" in Swedish with stickers and die cut the letters from Tim Holtz "word play" - LOVE that die, so versatile!

I will show you more of the finished book later in the weekend, when I have a chance to finish it. I'm super pleased with the cute result so far, there have been a few disasters on the way - LOL!

But if it's not ok to enter a unfinished project, please tell me and I will just accept the fact that there is in fact not time for every thing in life and just go to bed next time - LOL!

Thanks for stopping by!!
Talk to you soon!

Tuesday, August 14, 2012

Simon says "BINGO"


Super great challenge, but as always I'm cutting it close - LOL!
Seriously! I've been looking forward at making this project for a whole week, but something always keep getting in the way. Maybe one should take a day off from work, just to be able to participate - LOL!

It took me awhile to realize that you didn't actually needed to use all the embellishments in the grid. But as a newbie, I racked my brain thoroughly to be able to match the grip pattern. Now I get it watching the awesome DT projects, you can pick the row which looks most appealing to you - but I'm not sure, so I stick with my conception. Else it wouldn't be a challenge for me any more as I spent so much time figuring out how to fit everything on one card. It would sort of feel like cheating on myself...

The sketch I followed
Here is the card I made - I believe I managed a full house! If you look closely you'll find that I scored and edged the grid pattern on my card as well and I tried to copy the sketch positions. My "Free" is a stamped pic of Anya from the Hats Off set, which I coloured with Promarkers. I will enter this card for the TGF's retro fresh challenge, which this month is to use the colour yellow, orange and baby blue - there was a hint of autumn feeling to it so I used the image with her wellies - LOL!


I used Maja design skärgårdsliv 6x6 and layered it on black cardstock as well as orange cardstock. I will also enter this card for Simon says stamp vintage challenge as I have used several of my favourite techniques - layering and colour cordination.

I have used Lindy stamp gang Marigold yellow orange to colour the lace and the flowers. Here I was racking my brain for orange embellishments - LOL! I also made the tag by colouring a scrap piece with adirondack color wash in sunset orange. I also found some left overs of trim from some magazine in orange and some bling as well.


Ribbon, die-cut and gems
Gems, punched butterfly, glitter (stickles)

Blomms, glitter (stickles) and lace

As it happens, I also had Tim Holtz dried marigold in distress ink and stickles, which were well used. The stickles is my glitter, there are also glimmer and shimmer from the LSG.


Lace, buttons and blooms

I had so much fun, just thinking of this challenge and how to incorporate more challenges in one project as I'm having a bit of a time issue. It all comes down to priorities I suppose... Yes, I'm a scrapoholic! I'm taking the first step and admitting to myself - LOL!


Thanks for stopping by!
Be sure to check out the blog of SSS and TGF, they have weekly challenges with awesome prices and DT for inspiration! 

Sunday, August 12, 2012

Simon says "Paint it up!"


Simon says stamp vintage challenge is "Paint it up!"
Luckly enough I had just bought some frames from IKEA and had already in mind to paint it.

I've mixed some adirondack dabber paint in sandal and espresso and brushed the frame. Not only did I get the colour I had pictured, but some pattern since the paint didn't blend a 100% with each other. So it looks a bit like wood, which I was extra pleased with.
I then brushed Distress crackle paint rock candy in different layer of thickness, depending on thickness, you can get different looks in your crackles. After the paint had dried and crackled I also added some stickles in antique linen.


To embellish the frame I used some I am roses flowers, these are quite large and i painted them from white with Lindy Stamp gang sprays in Clam bake beige and a bit o'bubbly. I also added dimension by highlight some parts with dark chocolate truffle. The roses I used are R21-1, R40-15 and R77-15. The rosebuds are T25-152 and T26-151.

A bit of bling and some Tim Holtz to top it of. I also added a key and lock charm as well as a heart charm.


Easy peasy project. 
Thanks for stopping by, let me know if you have any questions!!!


Saturday, August 4, 2012

What do you say challenge with a personal twist

I've bought simple stories mix & match album and recently I did a little "artpiece" to go in one of the 4x6 page protectors. I entered that piece in simon says stamp vintage challenge what do you say and as a personal challenge I decided to make another one to match. I used the same paper from simple stories, but the other side from the first piece.
For the first piece I had a quote in mind, but never used it as I didn't want to cover the background. I went a bit overload with the stamps - LOL! So for this piece, I tried to keep it simle. I used the same stamp sets, but didn't want to use exactly the same stamps. Although, I can't not use the birds - love that stamp! I put them more in the background though, as they were more in focus the last time. My goal was then to make the new piece the opposite from the first on. So the tissue tape is put vertical as suppose to more horisontal, it's on the right side compared to the stamped journey definition on the left at the first piece. Then I sort of lost the concept I believe, but I didn't notice until I compared the two and by then it was to late.


What's bothering me is that the flowers and the left side of the sentiments are almost identically positioned?! I later added the flowers as an element to the first as well, because I really wanted them on my second piece and since I wanted the same products on both of them... what's a girl to do:)

As there was still time on SSS challenge left, I entered this piece as well. The quote is a tag from G45 paper pad kraft reflections.

Thanks for hanging on to my ramblings - LOL!
Have a great day and may inspiration come to all of you!!!

Friday, August 3, 2012

What do you say challenge

Simon says stamp vintage challenge for this week was to use a sentiment. I had a qoute in mind, but as you can see I went mad with Tim Holtz stamps on the background so I needed something "lighter" as my focus.

The card is a 4x6 of simple stories "documented", but I'm not sure you can see the damasks in the picture. I' ve distressed the cut edge lightly with brushed corduroy. Then I stamped the images in crushed olive, Archival russet and coffe. The tissue tape is distressed with the brown and green to melt in with the paper better.

There are quite a number of text elements on this piece. Besides the tissue tape, there are a definition of "journey" stamped to the left in crushed olive. The script and the post stamp, the numbers on the man with the umbrella. "Artist" is also stamped to the left in archival russet. But the focus is the tag, which is stamped and distressed with brushed corduroy. 

It's not what I had in mind when I started my project, so I'll see if I like it more after I get used to it...

Thanks for stopping by!


Tuesday, July 31, 2012

 Prima sunkiss mini album

 I wanted to make a mini album for Simon says stamp challenge anything goes. The album was a piece of cake compared to the rest - LOL!


Besides starting a blog about my work, I also got me a facebook acount...
To document the album I took more then 20 pictures and that's not even with specific details, but just the pages in the album?! So I got the brilliant idea to make my first youtube-video... What was I thinking?! This is a lot for a techno beginner!

But here it is folks:)

I BOW TO ALL OF YOU WHO PUT SO MUCH LOVE INTO YOUR VIDEOS - THANK YOU SO MUCH FOR SHARING!!!

The album is made of Neenah super smooth desert storm paper. The size is adjusted to mainly fit primas sun kiss 6x6 paper pad.


All pages are pockets with inserts and the tabs are from a stampin up punch. They where all lightly distressed with vintage photo. I also stamped throughout the album with prima stamps and the inks I've used that coordinated with the papers are:
Adirondack Hazelnut
Adirondack Butterscotch
Archival in olive
Distress ink bundled sage


I've used Prima's sunkiss paper, but also used some pads I had in my stash. So I took some of the brown paper from Bo bunny's Gabrielle collection and some paper from Bo bunny's welcome home with home or family since it was for a newborn baby boy. I also loved the farirys in Primas nature garden, so I mixed some of them as well.

I hope the video works, hopefully it will do the album more justice to show the pockets and inserts etc...

If you have any questions or if it doesn't work I'd love to hear from you!


Sunday, July 29, 2012

Cheeky nurse card


Hi everyone!
Just a quick entry to some challenges here. I believe I will qualify to three challenge blogs.


My card is a 5 X 5 inch base and I had a really cool double sided paper with stars on one side and stripes on the other from Maja design Skärgårdsliv. Unfortunately I could not find any other paper to match the red, then the Mariposa paper. So with tears in my heart I had to cover it with Maja design. In order not to waste any of the Maja design paper I die cut the strip left over with the first place award ribbon from MFT. I hope that will count as my stripes for the TGF challenge.


Fingers crossed that these stripes will qualify!!!
If you look closely you'd see that there are tiny stars
among the stripes and stripes in the background of the stars as well.
So it's more stripy then you'd think from a first look.


I stamped the sentiment and die cut it using parts from the well worn greeting set. To have an outline around it I traced the die and cut it with scissors from scraps of the Mariposa paper left. Then I die cut a leafy flourish also by MFT. All the flowers are from IAR and sprayed with LSG creme bruleé starburst spray. I also used a pearl spray from "my" collection handmade from a youtube tutorial by Luvleescrapping, I mentioned it in one of my earlier posts.

You'd think I could have made a sketch challenge as well, but I'm a bit short for time and didn't dare to overload my creative stream to much. Maybe next time...
The olymipcs are running, so the next couple of weeks I should hopefully be able to scrap with a pure conscious as hubby-to-be will have loads of sports to watch - LOL! 

I also finally got my hands on the Cheeky geeky stamp. OMG that has really been a challenge. I wanted it ever since I first saw it, but it's been out of stock everywhere. I thought self portrait right away - me and my glasses, as you can see - LOL!!

Thanks for stopping by! 
If anyone has any questions about any of my work, please don't be shy - LOL!


P.S I also got a facebook page, so really putting myself out there - LOL! I'm not sure what to do with it though... Any ideas?

Saturday, July 28, 2012

Words of wisdom for a young lady

This week Simon says stamp vintage challenge is "Hey Girl". So Bring out the ladies!

OMG I had so much fun with this challenge and it probably took me longer to decide what I wanted to make, then to actually finish the work. Right away I got so many ideas for this challenge and of course not enough time!!! It was some time ago I sent my BFF a fun card, TGF cheeky collection came to mind. I have some layouts that need to be done, several mini albums that I should get started on, I could make something with G45 papers, the list goes on... So the challenge this week was actually to choose - LOL!

Recently I've gotten some printable vintage "photos" and I've been dying to try them out. This is the first time I use something like this, so it's also my crafting evolving. I've seen Racho113 done some wonderful art utilizing printed images of vintage girls and now I got the chance to try it myself. So next choice which picture?? They're all girls!!! I had sweet babys, adorable flower girls, vintage ladys, bridal ladys, marie antoinette - now that's a girl, right?
I decided to make a tag, since it has been a while and I love making tags. Unfortunately, I have such little space to store them, I rarely make them - unless I gift them. 

Anyway, I used a ranger no 8 manilla tag. For background I stamped parts of the large background stamp from the papillon set in Adirondack dye hazelnut, In the same ink I also used the word definition stamp from the lost and found set. I then distressed the edges of the tag with vintage photo. Then I ATGed my image randomly at the tag, which I also lightly distressed with vintage photo to hide the stark white cutting edge. I continued to stamp some script from the mini ornates set in Archival coffee. Because I still wanted the picture in focus I stamped the script on a piece of scrap paper and then stamped across the image without reinking.

The sentiment is from the lost and found clear stamp set and I stamped it in Archival coffee. I inked the edges straight from the ink pad in vintage photo in order to have really darkened edges. Perhaps I should to and get myself a walnut stain... Another step out of my comfort zone. The filmstrip is made with the same stamp set as the sentiment, but stamped in Hazelnut and distressed with the inking tool.


To top it of, I glued some IAR flowers and tied some ribbon at the top. It came together much faster then I imagined and I believe I will make more of these. We'll see if this may not be the only entry this time - LOL!


Products used: