We have yet another challenge at Anyone for Anya and it's time to bring out your glitter :)
Featured on my card is Cheeky Geeky sitting in front of an traditional old black board. I was in luck and had just picked up some basic gray alpha stickers in white. So there was no need for any of my messy handwriting - LOL! I've coloured her with my copics and the glasses and eyeshadow is a metallic pen to add some shimmer. (Hair: E31, 33, 35; dress: B91, 93, 95, 97)
The glitter is everywere - there are stickles in her hair band and on the white cardstock. The banners to the left is glitter ribbon from a RAK and I just attached them with a tiny attacher (I caved in and invested in one and so far I'm loving it).
To add to the school theme I used lots of prima engraver washi tape with numbers. Lastly I added some recollection bling and some die cuts out of green glitter paper of Cheery Lynn's olive branches.
I'm back with another adorable wee stamp that I coloured with my copics :)
The background is really simple with Prima designer paper. Maybe to simple, I now see that another layer contrasting the layers would have been appropriate...
Yet another sunday - yet another fun challenge at Anyone for Anya :)
This week you have the opportunity to win 5 digis from Wimsy stamps all you need to do is use a CCdesign or TGF stamp and follow this week's sketch.
Here is mine:
My card is really easy and fast made. The background paper is Prima divine. I coloured a CC design with my copics ( a winning from Anyone for Anya actually) and cut her out using lacey circles.
The roses are from WOC mulberry cherry blossom and open roses 25mm. The file tab die cut is from MFT die-namics and so is the sentiment. The arrows are stamped in memento dye ink in desert sand from Vintage finds. That's really it, the washi tape is from Teresa Collins and I added some bling for interest.
Thanks for visiting!
Can't wait to see what you create!
It started with a holder for a small candle, but I tucked the bird inside the cage instead.
It was also white to start with, but some acrylic paint and voila :)
It's a sand acrylic paint and I mixed a turquoise pearl paint with the same sand acrylic and got a gorgeous green.
That really made a differens and the rest is easy!
After
I made some candy gem acrylic sprays cling to the bird cage in yellow and green.
Then I hot glued some ruffled satin trim in celadon, which match the colour of my acrylic paint perfectly. I also had some flat back pearl in mint from Misty with went perfect with the colour palette.
I wanted to make a nest inside the cage and twined some more of the candy gem sprays in yellow and green to act as twigs. As egg I used the water blut flat back 10mm, they also fitted perfectly in the middle of the flowers on the bird cage, but I ran out of them :(
The small sweetheart blossom was the perfect size and super sweet as I tucked it on the "inside".
I added some acrylic chandilier charms to the chain and that's pretty much it :D
So I'm using my olde curiosity shoppe paper that I got from the store. Lots of layers going on here, the harderst part is to cover the gorgeous paper - LOL!
I also used the post card stamp from the French Country set#3, tied some ribbon and added a couple of WOC open roses 20mm (sprayed with LSG clam bake beige). But as you see I did not tie the bow very neat so the bingo chip became all crocked.
If you're hopping to me from Kelly you are right on the way:)
And if you've hopped from the beginning at Misty - congratulations!! You've made it to the final pit stop =D
I'm showing you a super easy tag with masculine influences. I started by stamping a large damask from Teresa Collins vintage find and stamped some music notes across the entire tag from the same set as the damask. Then I fussy cut the flowers and glued to the tag. Can you believe I the designer paper is Teresa Collins she said collection?
And it turned out the blue was a perfect match for G45 little darling sticker sheet which is were the letters are from.
To keep it masculine I didn't want any paper flowers or frilly lace so I made a simple bouquet of blue candy gem sprays and wheat leaf sprays in three-toned sage green. Threw in some stamens to add colour. The buttons are from my stash and the rest of the embellishment is from Tim Holtz. The ticket is a MFT die-namics & stamp set. The banners are stapled with a normal home office stapler.
There is alot of hidden blog candy to be won and the grand prize is
also hidden on one of the designers blog so please make sure to leave
comments and to follow all the blogs. Here is whats up for grabs for the
grand prize:
$20 Gift Card
*Must "like" the MBT Facebook page-Facebook
*Must be a MBT blog follower and comment on the hop post -Blog
*Must* follow and comment on all the designer's blogs
If you get lost on the way, don't worry. Here's the lineup :)
I'm back with another card for Anyone for Anya challenge layers!
Not only are there several layers on the card, but all elements are also matted - there are countless layers in there:)
You can also see embellishments from MB's Treasurista on the card. The lg eyelet lace with ribbon is so effective and the banner is made with twine in carrabean.
The roses are from The Rubber Buggy 20mm open roses from WOC.
I'm also entering this card in TGF challenges:
Retro fresh - layers
FFF - banners or flags
I'm here to show you my creation for creative inspiration at MB's Treasurista.
The features for this month was the colours red, blue and white and to showcase a templete from The crafter's workshop.
Here I used the mini bransches and some WOC cherry blossoms to create of a tree bransch. The designer paper is by Graphic 45, Bird Song. The colours of this paper is absolutely beautiful and the papers are stunning.
I used a blue design paper as my background, I also fuzzy cut some of the red lanterns to "hang" from the bransch. The metal embellish is from my stash, but all the rest is from MB's Treasurista.
I'm here today with a card that you can make with some beautiful products from MB's Treasurista:)
I'm letting the lyric collection setting the colour palette as it's absolutely gorgeous.
I wanted to really show off the paper so I haven't layered a lot of flowers.
On the top with all the banners - all that is just the paper. I've only highlighted the banners with the words with glossy accent. All the strings with the heart is also the paper and all I've done is added a flat back cabochon of the lovebirds.
I also wanted to keep the paper at the bottom as uncovered as possible and that little cluster to the left is all about the paper.
I coloured my Alice Beanie from TGF with my copics of course - I can't live without them :)
And put her in one of the frames from the paper, a cut apart element, on her bow I glued a flat back pearl.
The edge between the papers are hidden behind the drip venice lace and I've layered a row of mesh bling in the brown colour. To balance the egde of those products I added a flat back pearl string in light pink.
The flowers are sprayed with LSG salter water taffy from the Nantucket pearl set. The buttons are just from my stash, but I've tied some twine from the store. I've also added an acrylic butterfly with rhinestone amongst the sprays.
Wow!
You really responded in The Rubber Buggy's challenge anything goes :)
Well, here's another easy for you - a sketch!
Can't wait to see what you create!
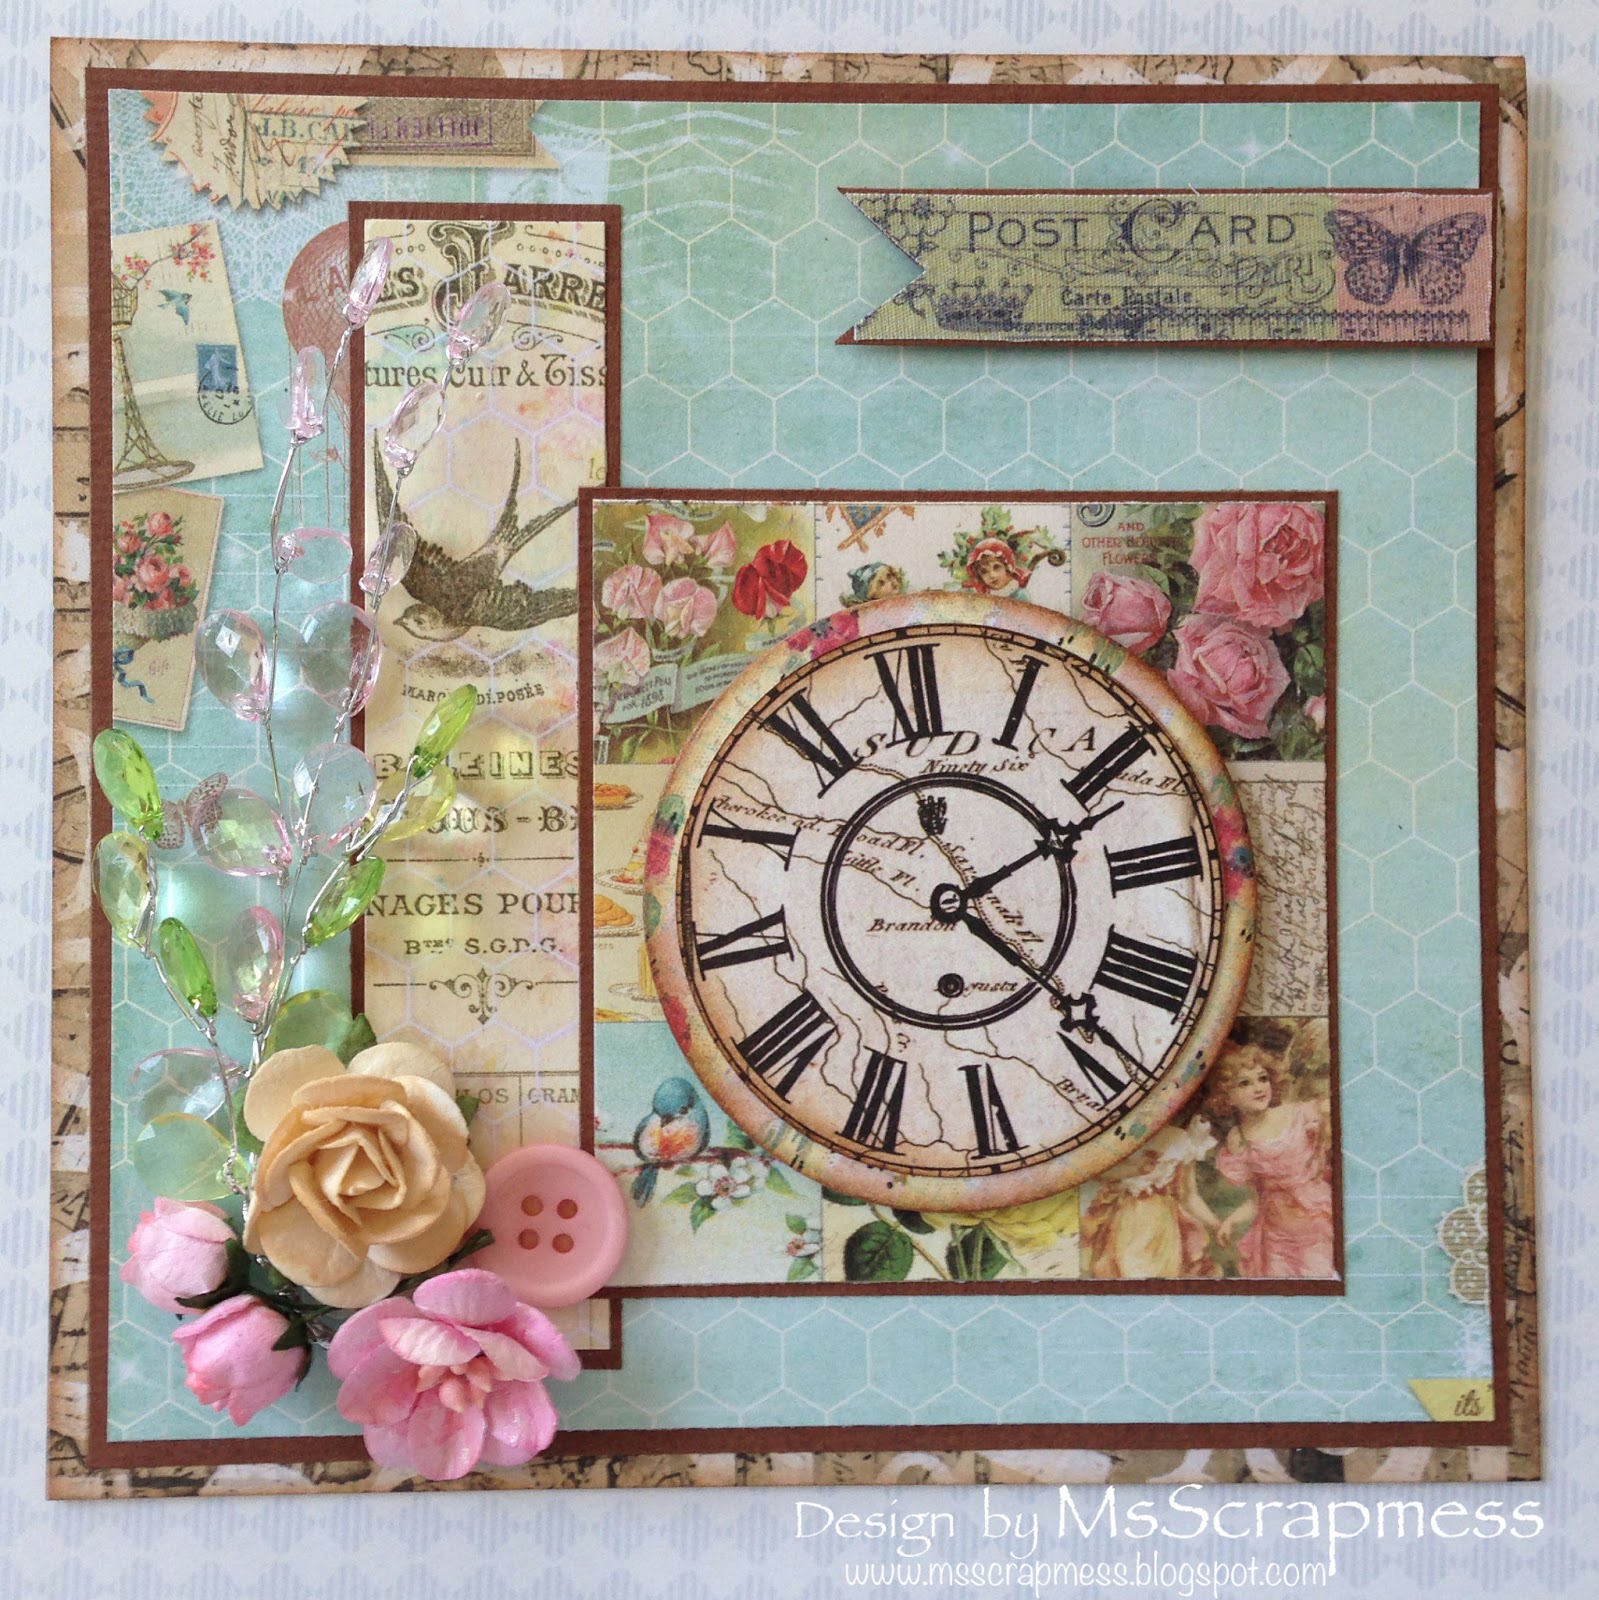
Here I used a wee stamp with some prima paper and embellished it with some gorgeous WOC flowers and acrylic sprays.
Here you can see Bubbling Tilda as my main image, but there is a lot from Graphic 45 as well on this card. Behind the image is the postcard stamp from Graphic 45 from French country stamp set #3. DP is from Prima divine and I'm trying to keep the colour palette. The image is coloured with copics and the WOC wild rose peach colour is deepened with LSG fuzzy navel peach and cocklebells coral.
It's party time at Anyone for Anya :)...
... and what do you need at a party - cake of course!
Here I have used Jill from the Creepin Crew in her party dress. The paper was from a friend in a RAK, but I thought the cuteness was balanced by Jill. The bling is from MB's Treasurista in the newest colour light blue and light pink. The mini satin flower is also from MBT, coming soon on the blog. The sentiment reads "everyone knows that BIRTHDAY CALORIES doesn't count" - I love that :D
Thanks for popping by!
Don't forget to participate in our challenge :)
For today's post for The Rubber Buggy, please scroll down.
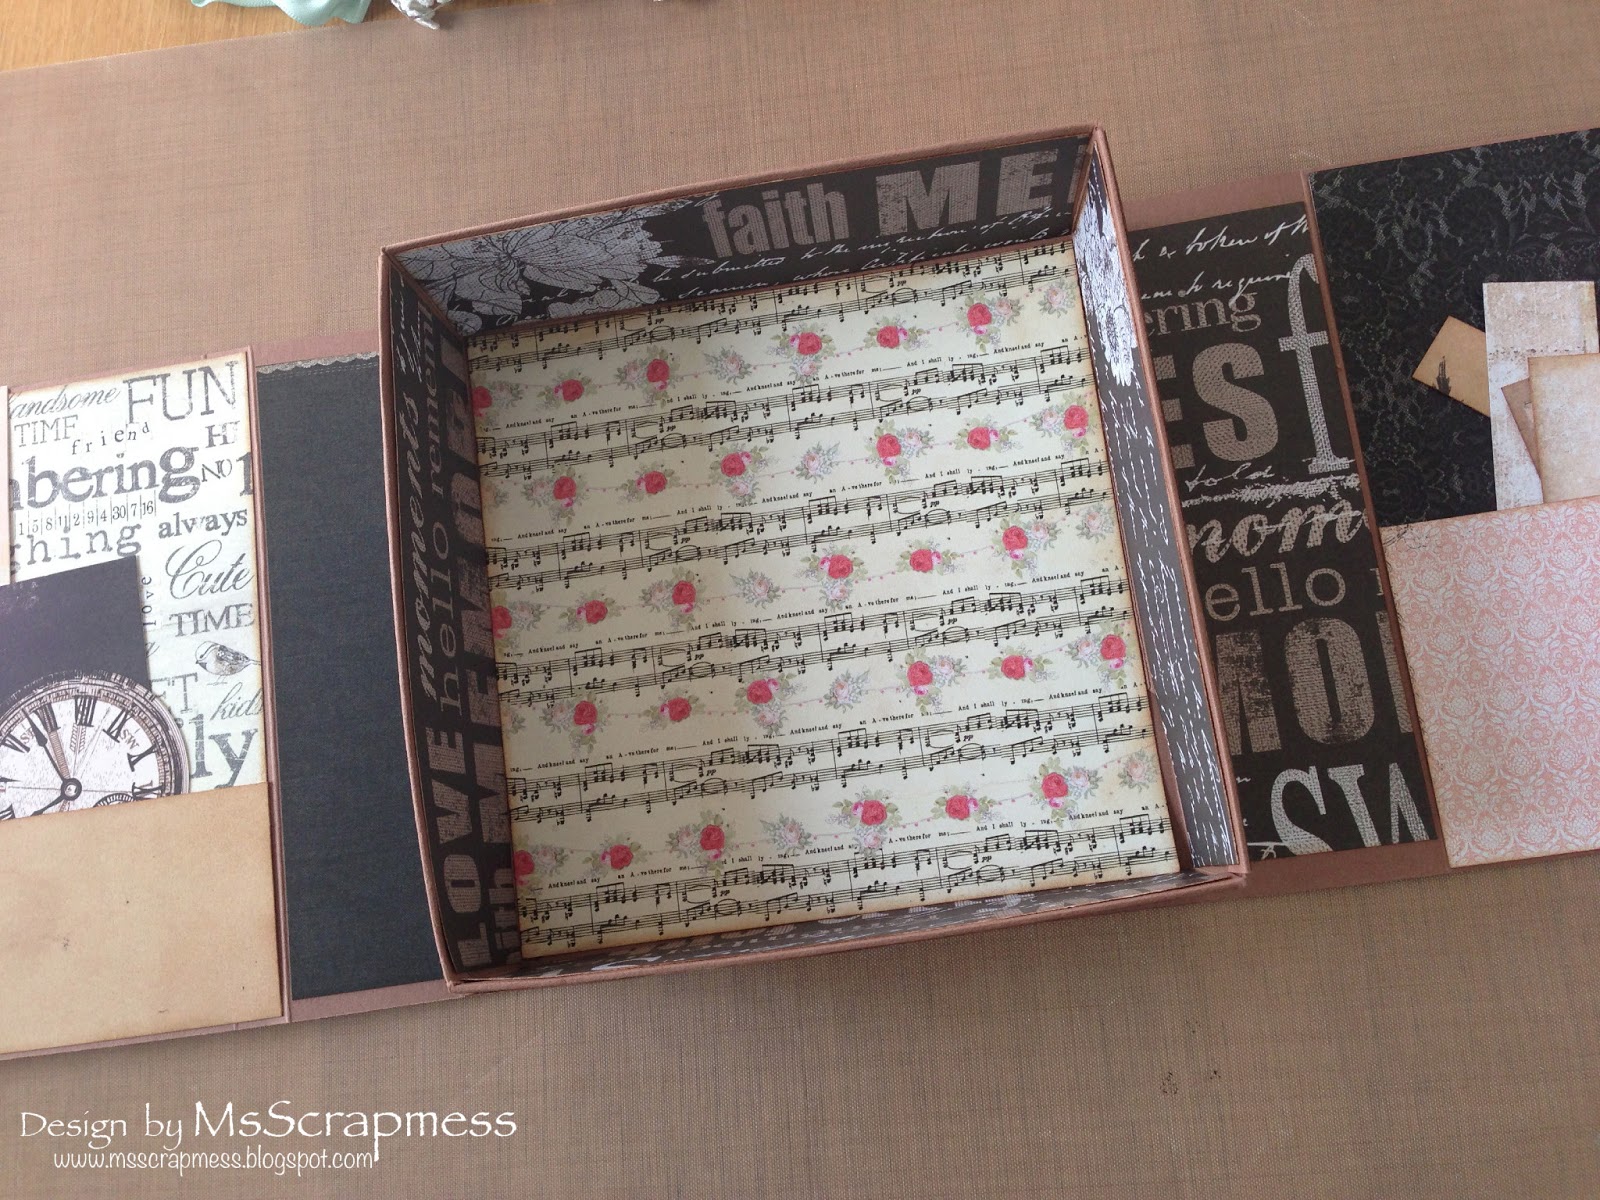
Today I trying to show you how to make a box.
I tend to do this fun little box when I'm gifting a mini album. I got the idea when I made a baby mini by 6x6 envelopes.
This one has a magnetic closure on the side and is a bit smaller so you will be able to only use two 12x12 cardstock, (For a 6x6 mini, you need 3 sheets)
Anyhow, the video is quite fast, as I fast forward in order to fit the 10min limit on youtube.
If you have any questions please don't hesitate to ask.
I start by marking the 12x12 paper at 4,5 & 7,5 on all four sides.
Then I score a line between the 7,5 mark and the 4,5 mark on the other side on all four sides - now you have the base of your box. If you wish for a smaller base leave a smaller gap between your marks i e 5 & 7. For a larger base leave a wider gap i e 4 & 8...
The next step is to score the lines for your sides or the height of your box. Here I scored 1,75 outside the base, I prefer to fold it double and glue a piece to the bottom - you'll see later. Therefore, I score it once more 1,75 outside the line I just scored.
You now have a 12x12 with a lot of diagonal score lines, time to cut some. How you cut is really prefable to you. But you need to have in mind that you are creating something to hold a corner. So the last scoreline of yours create a corner to the paper (Hold on to that line), now use the longest of the scorelines as your cuttingline and cut all the way to the base. Also cut the second line all the way to the same line as the base line. This part can be removed altogheter.
Now you are ready to start assembly your box - just fold all the lines towards the base and you'll see the box take shape. Glue everything together. The box is done!
For the covers, I do mine double folded, but you can use the same principle and make a gate fold, just a normal cover or what ever you creation might be in mood for.
If you made a box with a base smaller than 6x6, you can make the covers from only one 12x12, just cut it in half. If your box is larger, you probably need 2 sheets of cardstock if you want the covers to go outside your box as shown on the picture.
For the covers score on of the pieces as wide as your box, this will be the inner cover. Also score it one more as wide as the box is high. For me that means I'm scoring at 6 (a bit larger than my box, but I'll cut that away later) and the other at 7,75. That leaves about 4 left to go on the back of the box. It's optional to just cover half of the back and meet the other part in the middle. You will cover that later. To the other piece of cardstock. Depending on the size of your box you can be able to do a closure that overlap one of the sides. Just start backwards - I need 2 to the back, another 1,75 for the side and almost 6 for the front, which leaves me just about 2 for the closure. Now you have all the parts, just glue together and start to embellish!
I usually start by covering both the covers and the box with paper, both to add sturdiness and hide lines. Then you have endless possibilities to add flowers, sprays and ribbon/lace.
I hope you try it out - it was kind of hard to explain it like this, if you have any questions - don't be shy :D
I hope you enjoy it and once you've mastered the techniques you'll see how versatile this can be. You might even be able to add a window to one of the covers... or both! (You just die cut the covers before you glue them to the box!)
For more inspirational Teach me Tuesdays, please visit the blog!
If you need supplies to embellish your box with, please visit the store!
Due to some other people's anniverseries I got the remainder that it's also my birthday today:)
Just a year ago, I thought to myself that I needed a forum in order to participate in a couple of challenges - mainly MFT and TGF :)
Since that I've actually had the luck to win some challenges too:)
Anyone for Anya - time
TGF - SC32 oct 2012
TGF - CCN11 oct 2012
TGF - FFF April showers bring May flowers
I've also been fortunate enough to participate in a couple of design teams - this was something I did not expect in my first year - I'm so grateful for the opportunity!

+kopia.JPG)
+kopia+2.JPG)

.JPG)
.JPG)
+kopia+2.JPG)


.JPG)
.JPG)

+kopia.JPG)
+kopia.JPG)
+kopia.JPG)


.JPG)
.JPG)


.JPG)
+kopia+2.JPG)


 My latest announcement -


.jpeg)


.JPG)
